Thursday, September 20, 2012

Mirang Cozah le Laizo Tong


by No Than Kap
Mirang Cozah san laiih Falam tawng ti si loin Laizo an rak hmandan:

1906 ihsin 1920 tiangah Chin Hill school zaten Kawlca (Burmese) zirh a si. 1920 ihsin Kawlca si loin Chinca zirh thei dingin Mirang uktu le a hleice in Missionary pawlin nasaten an zuam. June 1921 ah Chinram DC Col. Burne hoin Tlawng inn ah Kawlca sinawn loin Chinca zirh a ṭhat thu an rel. An thurel mi cu Rangoon Education Department ah kuat a si. October 1922 ah Education Department in Maymyo ah conference an tuah ih Chin Hill tlawng zate ah Kawlca si nawn loin Chinca zirh dingin thu an relcat. Chinca an hril mi cu Laizo a si. (By the end of the year the recommendations of the June, 1921 (at Falam) conference had gone to the Education Department in Rangoon and been approved.. a conference was called at Maymyo for October, 1922 and decided that Laizo Chin was the language to be taught and English the second, with Burmese where desired. In November 1923, … the local government (in Chin Hills) had finally made a decision to carry out the recommendation of Maymyo conference, namely, that education should be carried on in vernacular, using one dialect, … the Chin language chosen was Laizo, spoken in the Falam area. (Robert Johnson, History of the American Baptist Chin Mission. Vol. I. p. 458-460).

Hitawk laiah JH Cope (Tedim siangbawi) cu Honorary Inspector of Schools a si. Anih cun Chin Hill tlawngpawl ah Laizo lawng zirh ding ti cu ṭha a ti lo. Tedim lamah Kamhau zirh a duh (Cope was not entirely pleased with the decision to concentrate on but one of the Chin languages, for he felt that Kamhau would be more suitable for the Tedim district (History of the American Baptist Chin Mission. Vol. I. p. 460). Asinan Rangoon ih Education Department cun Chinca pakhat lawng zirh a duh. (But the government people at Maymyo insisted that only this one dialect of Chin be used. Cf. History of the American Baptist Chin Mission. Vol. I. P. 459.) NTK


Wednesday, September 19, 2012

How do I change default font in Word 2011 for Mac


Customer Question

How do I change default font in Word 2011 for Mac?
Submitted: 650 days and 13 hours ago.
Category: Computer
Status: CLOSED


Optional Information

Optional Information:
Computer OS: Mac OS X
Browser: Safari

Already Tried:
Word 2011 help, preferences, on line search.


Accepted Answer

Follow these steps:

1. Open a new Word document. Do not name it or change any of it's content.
2. Go to the Format menu, select "Style"
3. Make sure "Normal" is highlighted in the Styles box.
4. Click the modify button, change any default settings, and apply!

That should do it!

Please click on Accept Answer so I will receive recognition for answering your question or post back here if you need more help.

Picture
Expert: Tom K
Category: Computer
Pos. Feedback: 100.0 %
Accepts: 563
Information Systems Manager
BS in IT from University of Massachusetts Lowell, 10+ years working on computer related problems


650 days and 13 hours ago.

Customer Reply

Your answer may only change style/ font for that new document? I have found Format Menu: select Font, select font such as Times New Roman, then click on Default. This changes the default font for all future docs.


Read more: How do I change default font in Word 2011 for Mac - JustAnswer http://www.justanswer.com/computer/4bhl1-change-default-font-word-2011-mac.html#ixzz26yhyaBQX


Friday, September 14, 2012

Why Fasting?


 by Sayama Sa Lian Kai

What?
1.     Having fellowship with God without eating

Kinds?
1.     Normal: drink only water (ti lawng in)
2.     Partial: fasting only half day (ni hrek lawng rawl ul)
3.     Absolute: fasting without eating and drinking (ziang khal in ei lo)

Why?
1.     You will overcome your evil desire (Tisa menmen ih kan neh lomi nehnak)
2.     Deeper fellowship with God (Rawl ul lo cun, thinlung tak ih Pathian pawlkom a theih lo)
3.     Genuine repentant and obedient life (Lungsirawknak taktak kan nei thei)
a.     Result
                 i.     Freedom from curse and evil actions (Camsiatnak le nun daan sia sung in luat)
                ii.     Healthier body (Taksa a dam)

Where?  - Everywhere
When? – Meal time is to be used as prayer time
How? – Do exercise to maintain heartbeat
Side effect – vomiting is normal

Result?
1.     H/sp will talk to you
2.     You will taste the life of kingdom

Preparation:
1.     To fast for three days, prepare yourself three days before by praying and reading the Bible (Nithum na ulh ding le nithum preparation la in Thlacam, Bible siar)
2.     After fasting:
a.     Don’t eat solid food and meat but fish is ok (Sa ei hlah but nga lawng)
b.     Squash, and papaya, cantaloupe etc are fine (Thlamhmai, hnuhnun pawl ei aw)


Tuesday, September 11, 2012

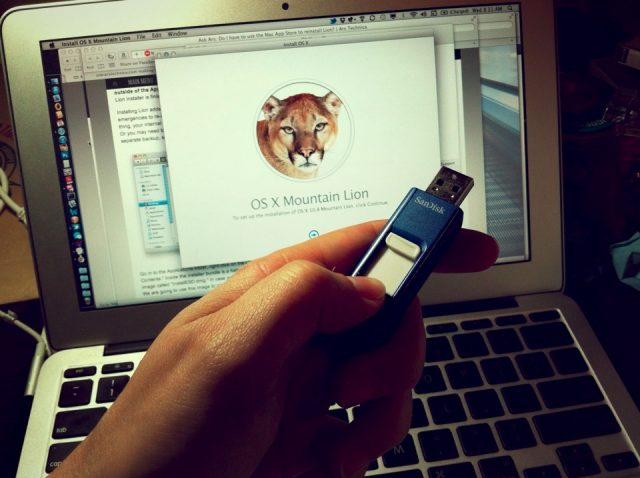
How to create a bootable, backup Mountain Lion install disk


Need to install Mountain Lion on multiple Macs? Here's how to do it.

It's easy to make your own Mountain Lion install disk.
Happy Mountain Lion Day! Now that you have downloaded the 4.34GB installer, you may want to install Mountain Lion on more than one of your personal machines. Do you really need to wait 45 minutes or more for each one? Absolutely not! Just make your own bootable install disk using our handy tutorial.
We have instructions for those of us who just want to get it done—using the donation-ware Lion Diskmaker app—as well as those that don't mind a little extra clicking to do it yourself.
Important warning: the OS X installer will delete the necessary file needed to make your own install disk once it runs. Therefore, you need to either make a copy of the installer outside of the Applications folder or make your install disk before upgrading.
Got it? Good—let's get started.
Here's what you need:
  • An 8GB or larger USB flash drive, other external disk, or 4.7GB DVD-R
  • Mountain Lion installer app downloaded from the Mac App Store
  • Optional: Lion Diskmaker app
We recommend a USB flash drive for your backup installer; they're cheap and easy to store and transport. Other external drives will also work, but make sure the type works with all your Macs—USB is the most universal. You can also burn the installer to a DVD-R, but booting and running the installer from an optical disc is s-l-o-w.

There's an app for that

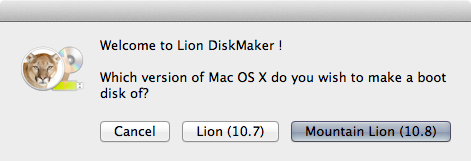
If you find digging in to bundles and using Disk Utility to be tedious or bothersome, you can thank developer Guillaume Gète for making Lion Diskmaker. His app automates the process of making a bootable install disk for both Lion and Mountain Lion—just run the app and let it do its thing.
(Why not rename the app to something more generic like "OS X Diskmaker"? Gète says he just likes the existing name better, and besides, it's less likely to catch the ire of Apple's lawyers.)
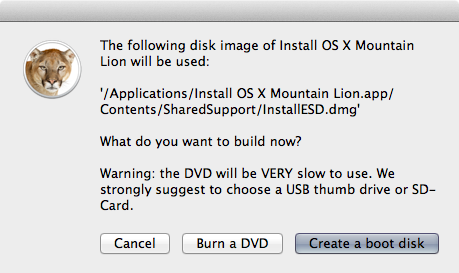
Just download the Lion Diskmaker app, unzip it, and run it. You'll basically need to click four buttons: "10.8 Mountain Lion," "Use this copy," "Create a boot disk," and, if you're using a USB flash drive as recommended, "An 8 GB USB thumb drive." It's really that simple; Lion Diskmaker takes care of the rest. The process will take about 30 minutes or so using USB 2.0 (it should be faster if you have a USB 3.0-compatible flash drive and newer Mac).

Still easy enough for the DIY-er

If you like doing things yourself, however, the process is still pretty straightforward for any user comfortable with right-clicking and drag-and-drop.
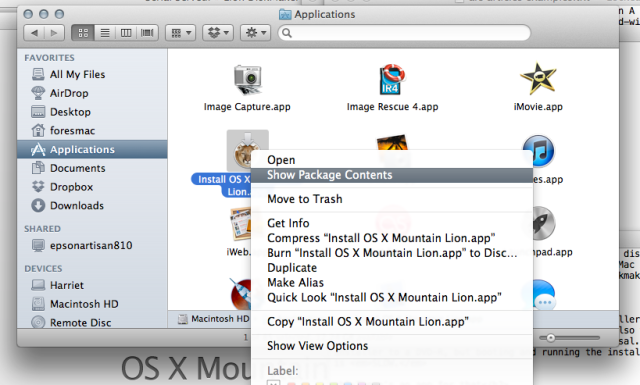
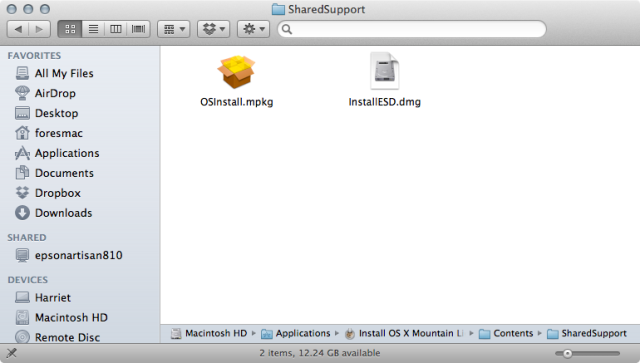
Start by right-clicking (or control-clicking) on the "Install OS X Mountain Lion" app, which should be in your main "Applications" folder after downloading. Navigate to Contents > Shared Support, and you should see a disk image called "InstallESD.dmg." We will restore this disk image to our flash drive (or other disk) using Disk Utlity.
Enlarge / Right-click to dig into the installer's contents.
What you're looking for: InstallESD.dmg.
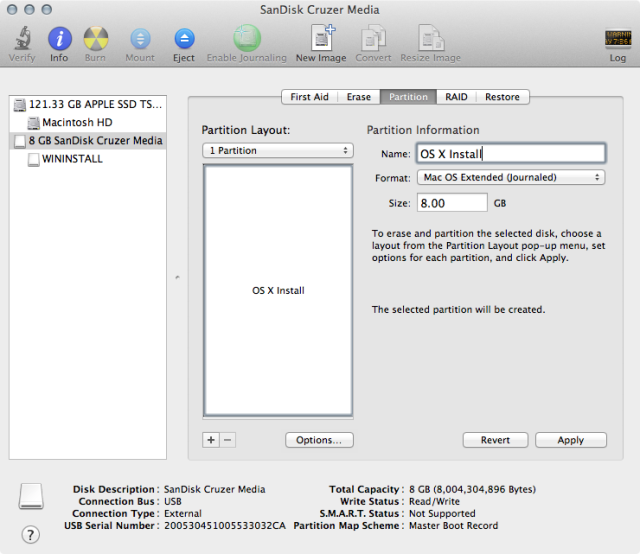
Then launch Disk Utility. If you're using a USB flash drive or other external disk, you'll need to make sure it's formatted as "Mac OS Extended (Journaled)." Under the partition options, also make sure the partition type is set to "GUID Partition Table," otherwise it won't be able to boot an Intel-based Mac.
Click the "Options" button and make sure the partition type is "GUID Partition Table."
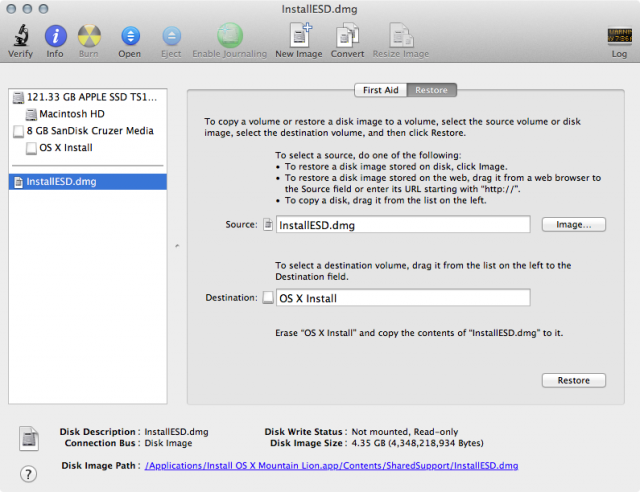
Drag and drop the "InstallESD.dmg" into the "Source" box in Disk Utility. Then click the "Restore" button on the toolbar. Drag your newly formatted drive into the "Destination" box, and click the "Restore" button. The process should take about 30 minutes or so, less if your drive is particularly speedy.
Set your source and destination and click "Restore."
UPDATE: Some users have reported getting a "Could not restore – Invalid argument" error at the end of the restore process. Our testing shows the error message can be safely be ignored; the drive can be mounted and will boot your system to install Mountain Lion. As noted in the comments, however, mounting the InstallESD.dmg file before performing the restore process avoids triggering the error message.
If you are making a DVD, click "Burn" and select the image as a source. Once Disk Utility is done, you will have a bootable install disk.
As with Lion, the install disk includes the same options as the emergency recovery partition created when you install Lion or Mountain Lion. With it, you'll be able to use Safari to find troubleshooting information, run Disk Utility to fix filesystem errors, restore from a Time Machine backup, or install Mountain Lion from scratch on any compatible Mac.

Monday, September 10, 2012

How to Buy a House


Mary Hunt

Editor's note: This article appeared originally at Debt-Proof Living on August 31st 2012. 
When the housing bubble burst in the U.S., home prices across the country dropped significantly. As painful as this has been for many, this situation has made it possible for many people, who before would not have been qualified, to enter the housing market.
But is it really better to buy a home than to rent? Conventional wisdom has always pointed out that when you rent, you are just throwing money away every month. But that’s a one-sided argument. On the other side is the fact that the equity you may build from buying is mostly offset by the money you will “throw away” on property taxes, homeowners insurance, maintenance and mortgage interest.

In decades past, homeowners could pretty much count on their equity (the difference between the outstanding mortgage amount and market value of the property) to grow substantially each year. This usually made buying so much more attractive than renting, from a financial standpoint. However, since 2008, that benefit continues to be questionable.

There does remain one significant benefit for buying over renting: You get to freeze your monthly payment for 15 to 30 years and then stop paying it altogether. This offers the promise of a rent-free retirement. If there is one thing you will not want to have once you stop working is a monthly mortgage payment, or rent.

Buying for the first time can be overwhelming. In an effort to calm fears and build confidence, here are the basics for buying a house.
How much do houses cost? The national median existing single-family home price in the U.S. was $181,500, as of July 31, 2012. That means half are more and half less than that median figure.

How much can you afford? Generally, multiply your gross annual household income by three and you’ll know your comfortable price range. For example, if your total household income is $75,000 annually, you should be looking at houses in the $225,000 range. A loan broker might tell you something quite different, but remember this: The biggest mistake you can possibly make when buying a home is to get in over your head.

Mortgage. A loan on real estate is “secured” and called a mortgage. By “secured” this means that if you fail to pay as promised, the lender can take the property as payment, through a process known as “foreclosure.”
Most home mortgages are for 30 years, meaning that if you make all 360 principal and interest payments, the loan will be paid down to $0, and you will own the property “free and clear.” The monthly payments on a 15-year mortgage are going to be more, but you will own the house in 15 years, and avoid having to pay a lot of interest.

How much will my payments be? Of course there are variables here depending on interest rates, but generally your  payment will be 0.75 to 1.15 percent of the purchase price. On a $150,000 home that’s $1,687 to $2,587 per month, which includes taxes and insurance.
The bigger your down payment, the lower the monthly payments. The lower the interest rate, the lower the monthly payments. The longer the loan term, the lower your monthly payments. Keep in mind that it’s better to get a shorter loan so you pay it off quicker and save on interest, if you can afford the higher payments.

Money you need up front. You will need money for the down payment, closing costs and miscellaneous costs.

Down payment. You will need 3 to 20 percent of the purchase price in cash for a down payment. The actual amount will depend on your credit score and the terms and conditions required by the lender.
Closing costs. Expect closing costs to be from 1 to 8 percent of the purchase price. This covers the loan fee, also called “points,” charged by the lender plus other loan origination costs.

Miscellaneous costs. This is money you will pay up front to cover things like the application fee for the loan, the appraisal of the property, transfer fees, a professional home inspection and so forth. Your miscellaneous fees will be in the range of $250 to $800.

All together, on a $225,000 purchase price, you should plan on $40,000 to $65,000 up front, depending on the down payment, the terms and conditions of your loan and other related costs.

Qualifying for a mortgage. Generally, you need four things to qualify for a mortgage these days:
  • Money for a down payment.
  • Household annual income that is 2 to 3 times your monthly mortgage payment.
  • Two years of solid employment with the same job or in the same field.
  • A good credit score (or credit score average of the joint buyers).
Steps to buy a house
1. Get your credit reports. Go to AnnualCreditReport.com to get free copies of your credit reports from each of the big three credit bureaus. You will need a good score of at least 740, depending on the lender (if joint buyers, average your two scores). If you need to clean up your report to raise your score by disputing items or changing your personal information, now is the time to do that.
2. Go to your bank or credit union and speak to a loan officer. Say that you want to buy a house and want to fill out an application for a mortgage. This will  result in a “pre-qual” letter that says the amount you can qualify to borrow.
3. Find a real estate agent. Get referrals from friends. The seller pays the real estate commission upon the final sale, so you won’t have to come up with money to pay your agent.
4. Discuss with your agent. Bring out your pre-qual letter. Talk about the area you would like to live and your list of “must haves.” Your agent will give you a list of properties that may fit your criteria.
5. Disclosure. Once you find a home that seems interesting and meets your needs, ask for the seller’s Disclosure Form. This lists everything about the property that the seller is aware.
6. Make an offer. If all is well with the Disclosure and you want to make an offer, ask your agent to suggest how much to offer, without going so low you lose out altogether.
7. Submit the offer. The agent will complete the property paperwork to put your offer into writing. The offer includes the price you are willing to pay together with the time frame, and what items if any that you want to be included in the sales price of the home.
8. Inspection. Once your offer is accepted (it may require a few counteroffers back and forth), arrange to have the house inspected by a professional. This may cost you $350 or more, but it will be worth every penny provided you get an experienced inspector.
9. Appraisal. Arrange with your agent to have the house appraised. Your lender will be insistent that the home have a market value consistent with the amount of your loan.
10. Get insurance. Your lender will require that you have proper homeowners insurance for fire and other disasters in place upon closing.
11. Closing. Depending on the state laws where the property is located, you will go to an escrow office, a title insurance office or an attorney’s office to sign all of the documents and take care of any other paperwork. You’ll owe some money, such as the down payment, and closing costs unless you got those rolled into the mortgage. You’ve either already arranged with your bank to wire the funds to the closing company, or you will bring a bank check with you to closing. You’ll receive access to the property according to the details and terms of your contract with the seller.

Congratulations, you are now a homeowner!

"Debt-Proof Living" was founded in 1992 by Mary Hunt.  What began as a newsletter to encourage and empower people to break free from the bondage of consumer debt has grown into a huge community of ordinary people who have achieved remarkable success in their quest to effectively manage their money and stay out of debt.  Today, "The Cheapskate Monthly" is read by close to 100,000 Cheapskates.  Click here to subscribe.
Publication date: September 5, 2012

Monday, September 3, 2012

Why is my MacBook Pro fan blowing nonstop even when I have nothing open and running?


Whenever my macbook pro isn't sleeping or off it is constantly making that white noise of a fan blowing and its very annoying and its making the battery die twice as fast. I've had my mac for over a year and this just started happening in the last couple weeks. Anyone have a clue as to what's going on or how I could go about fixing this in the cheapest way possible?

Best Answer - Chosen by Voters

Did you check your Activity Monitor to make sure nothing is hogging process power?

Sounds like something is seriously wrong.. like a broken temperature sensor.
If it's less than a year old or you have Applecare, take it to the Genius bar at an Apple store pronto.

Also, download SMC fan control.
http://www.macupdate.com/app/mac/23049/s…

Edit: this is a MACBOOK people, not a f**cking Windows computer. It's probably NOT clogged with dust or having heatsink issues.
Macbooks don't have "vents at the bottom".